Top Crochet Braids Hairstyles to Try This Year
Okay, can we talk about crochet braids for a hot minute? Because honestly, they’ve been a total game-changer for me and I’m kinda obsessed! If you’re tired of spending your entire weekend (and paycheck) at the salon, or you’re just looking to switch up your look without the commitment, girl – this is IT.
I’m not even exaggerating when I say crochet braids hairstyles are like the Swiss Army knife of protective styling. You get all the benefits of keeping your natural hair safe and sound, but you can literally transform into a whole new person in just a few hours. Plus, you won’t be broke afterward – which is always a win in my book!
So What Exactly Are Crochet Braids?
Don’t worry, it’s not as complicated as it sounds! Crochet braids (some people call them latch hook braids) are basically when you use this little hook tool to pull hair extensions through cornrows in your own hair. Think of it like making a friendship bracelet, but for your head – and way cooler.
Here’s the thing that blew my mind when I first learned about it: the final look doesn’t even have to be braids! I know, right? You can end up with gorgeous curls, twists, or even poker-straight hair. It’s like catfishing but for hairstyles, and I’m totally here for it.
The “braid” part is really just talking about the base you create with your natural hair – usually some simple cornrows. Then you crochet whatever texture you want on top. Genius, honestly.
Getting Your Natural Hair Ready (It Matters More Than You Think!)
Your hair underneath is the foundation of this whole operation, so we need to treat it right. I used to just throw in some dry shampoo and call it good – big mistake!
Here’s What Actually Works:
Start with a really good wash – I’m talking two rounds with a sulfate-free clarifying shampoo. Get all that old product gunk out of there! Your scalp needs to breathe.
Then do a deep conditioning treatment. I know, I know, it takes forever, but honestly? Leave that mask on overnight if you can. Your hair will be like “thank you, I love you” for weeks.
Don’t forget the leave-in conditioner before you start braiding. And please, PLEASE use some detangling cream with slip. Future you (when you’re taking these out) will send thank-you cards.
If you’re gonna blow-dry first, use some heat protectant. I love anything with castor oil – it’s like armor for your hair.
Once your cornrows are done, oil that scalp! Get one of those little bottles with the pointy tip – makes life so much easier.
Prepping Your Extensions (Yes, You HAVE to Do This!)
Real talk – you absolutely MUST wash your extensions before putting them in. I don’t care how clean they look in the package. These things come from who-knows-where and might have all kinds of stuff on them that’ll make your scalp angry.
For the Silky Stuff (like Bohemian hair, water waves): Make a little spa bath for your bundles! Half a bowl of water, throw in a cup of conditioner, and let them soak for a couple days. It’s like a hair vacation before the hair vacation.
For the Coarser Textures (Jamaican braids, tight curls): Use dry shampoo or co-wash instead. Trust me, these get all tangled and weird if you wet-wash them.
Pro tip: If you can swing it, human hair extensions are SO worth the extra money. They’re lighter, tangle way less, and just feel more natural. Your neck will thank you!
Part 2: Actually Installing These Bad Boys
Picking Your Base Pattern
Most of the time, simple straight-back cornrows are gonna be your best friend. They work for like 90% of crochet styles, so don’t overthink it!
But if you wanna get fancy, there are some cool tricks:
Individual Boxes: Instead of cornrows, section your hair into little squares. It prevents that “helmet head” look and makes everything sit more naturally.
Perimeter Braiding: Do regular braids around your hairline and crochet in the middle. It looks super natural, especially if you leave some of your own hair out around the edges.
There’s also something called the “invisible knot method” but honestly, that’s getting pretty advanced. Start simple!
The Actual Crocheting Part
The latch hook is your new best friend. You basically just pull pieces of the extension hair through your cornrows from underneath, working from front to back. It’s kinda therapeutic once you get the hang of it!
The best part? You can totally do this yourself! Any little mistakes just get hidden in all the texture and volume. It’s very forgiving.
How Long This Whole Thing Takes
If you’re new to this, plan for like 4-6 hours. Don’t schedule anything important afterward because you might be tired! Once you get good at it though, you can knock it out in under 3 hours.
You’ll need about 4 packs of hair for shorter styles, maybe 7 for the really long stuff. Always get an extra pack though – better to have too much than run out halfway through!
Part 3: Keeping Them Looking Fresh (The Real Secret Sauce)
This is where a lot of people mess up, but it’s actually pretty simple once you know what you’re doing.
Daily Maintenance That Actually Works
Sleep in a Satin Bonnet EVERY NIGHT: I cannot stress this enough! I used to think it was optional – it’s not. Your hair will look like a bird’s nest without it, especially if you have coarser textures.
Tame the Frizz: A little mousse goes a long way. And don’t stress about trimming flyaways every few days – it’s totally normal with synthetic hair.
Washing Your Crochet Braids
After about 2 weeks, start using dry shampoo every 4 days or so. It’ll keep everything fresh and add some nice shine.
If you went with human hair, you’ve got more options. Even if it gets a little frizzy from washing, some oil and a tiny bit of hair honey will smooth it right out.
How Long Can You Keep Them?
Realistically? 4-6 weeks is the sweet spot. Some people push it to 8 weeks, but honestly, your natural hair needs a break by then. I usually get bored around the 4-week mark anyway and want to try something new!
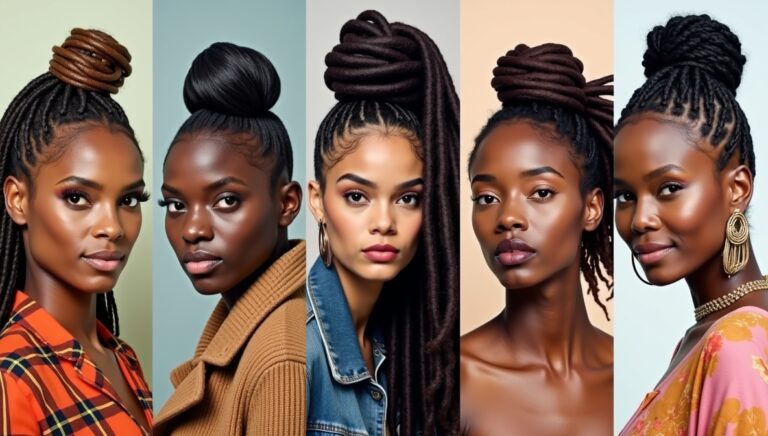
Part 4: All the Amazing Styles You Can Try
This is where it gets fun! The options are literally endless.
Pre-Made Styles (AKA the Easy Button)
Faux Locs: You get that gorgeous loc look without the years of commitment. Perfect if you wanna test drive the style!
Passion Twists: These have this really pretty crinkled texture that’s just so pretty. Plus, there are tons of 2-hour tutorials on YouTube – perfect for beginners.
Senegalese Twists: Super sleek and elegant. The pre-braided ones just loop right through – couldn’t be easier.
Marley Twists: Like Senegalese but with more texture. They’re a little more rope-like but still gorgeous.
Loose and Flowy Styles
Medium Afro: Want that perfect afro without waiting years to grow it? This is your answer! Try different colors for something really fun.
Straight Blowout: Get that fresh-from-the-salon look without frying your natural hair. Length and movement without the damage!
Getting Creative
Crochet Box Braids: This one’s a little more involved but the results are incredible. You basically braid your natural hair first, then crochet pre-braided pieces into each one. Super flat and natural-looking.
Short Styles: Don’t sleep on short crochet styles! They’re perfect if you’re always on the go, work out a lot, or just prefer less hair around your neck. Tapered afros and pixie cuts can be absolutely stunning.
Honestly, you can make crochet braids look like anything – straight, curly, twisted, braided. The sky’s the limit!
Part 5: When Things Go Wrong (And How to Fix Them)
Let’s be real – sometimes stuff happens. Here’s how to deal with the most common issues.
When They Feel Too Heavy or Bulky
If your head feels like you’re carrying a backpack up there, you probably used too much hair or your base is too tight.
Quick Fixes: Try human hair next time (it’s lighter), or do individual boxes instead of cornrows. You can also mix in some regular braids around your hairline to make everything look more natural.
Taking Them Out (The Scary Part)
This can be tricky if your hair grew a lot or got matted underneath.
Best Approach: Take your time and cut as close to the knots as possible. Be super careful not to cut your own hair! Always, ALWAYS deep condition afterward.
When They Look a Little Too “Fake”
Sometimes crochet braids can look a bit wiggy, especially as your natural hair grows out.
Prevention: Individual braids around your hairline work wonders. Also, don’t keep them in longer than 6-8 weeks. And definitely check out some “illusion braid” tutorials on YouTube!
Scalp Drama
If your scalp gets irritated, it’s usually because you didn’t wash the extensions first, or your cornrows are too tight.
Simple Solution: Always, always wash those extensions! And make sure your base braids are snug but not pulling. You shouldn’t have a headache after installation.
Final Thoughts: Just Do It Already!
Look, I could keep going about crochet braids forever (my friends are probably sick of hearing about them), but here’s the bottom line: they’re amazing. Quick to install, budget-friendly, super versatile, and your natural hair stays protected and healthy.
Whether you’re a total beginner or you’ve been doing protective styles forever, crochet hair styles braids are seriously worth trying. You can switch up your look whenever you want without any major commitment, and honestly? That freedom is priceless.
So grab some hair, watch a few YouTube tutorials, and give it a shot. Worst case scenario, you’re back to your regular hair in a few weeks. Best case? You’ll find your new favorite protective style that saves you time, money, and keeps your natural hair thriving.
Trust me on this one – your hair (and your wallet) will thank you!